Introduction
Did you know that investing in a small greenhouse can extend your growing season by up to three months, potentially increasing your yield by 50% for certain crops? Many home gardeners face the challenge of unpredictable weather, limited space, and shorter growing periods, often leading to frustration and fewer harvests. But what if you could create a microclimate right in your backyard, balcony, or even indoors, allowing you to cultivate your favorite plants more efficiently and year-round? This is where creative mini greenhouse ideas come into play. By setting up a compact, controlled environment, you can protect seedlings from harsh weather, propagate cuttings, and even grow exotic plants that might otherwise struggle in your local climate. Imagine fresh herbs in winter or early spring tomatoes – all from your own DIY mini greenhouse.
Tools & Materials Needed
Building your own mini greenhouse doesn't require a commercial-grade setup or a hefty investment. In fact, many successful mini greenhouse ideas utilize repurposed materials. Here’s what you'll typically need to get started, along with some eco-friendly alternatives:
-
For the Structure:
- PVC Pipes or Wooden Stakes: Lightweight and easy to assemble for a frame. PVC is durable and weather-resistant, while wood offers a more rustic aesthetic. For an eco-friendly option, consider bamboo stakes or reclaimed wood.
- Clear Plastic Sheeting: UV-resistant greenhouse film (6 mil polyethylene is recommended) or old clear shower curtains for an ultra-budget-friendly alternative. Ensure it’s transparent enough for good light penetration.
- Zip Ties, Clamps, or Staples: To secure the plastic sheeting to your frame.
- Hinges and Latches (Optional): If you're building a more robust structure with an opening lid.
- Bricks, Rocks, or Sandbags: To weigh down the edges of the plastic sheeting and prevent wind damage.
-
For Planting:
- Seed Starting Trays or Small Pots: Biodegradable pots made from peat or coir are excellent eco-friendly choices.
- High-Quality Seed Starting Mix: A sterile, fine-textured mix provides an ideal environment for germination. Look for organic blends.
- Seeds or Small Plant Starts: Choose varieties suitable for your climate and the space available in your mini greenhouse.
- Watering Can with a Fine Rose: Gentle watering prevents dislodging delicate seedlings.
- Plant Labels: Essential for tracking what you’ve planted!
-
Optional but Recommended:
- Thermometer/Hygrometer: To monitor temperature and humidity accurately.
- Small Fan: For air circulation, which helps prevent fungal issues.
- Heat Mat: Accelerates germination for many seeds, especially in cooler environments.
- LED Grow Lights (for indoor setups): Crucial for providing adequate light during shorter days.
Time & Effort Overview
Setting up a basic mini greenhouse can be surprisingly quick, often taking just a few hours depending on the complexity of your chosen design. Compared to establishing a full-sized garden bed, which might require extensive soil amendment and preparation, a mini greenhouse offers an almost instant solution. Germination rates inside a controlled environment can be significantly higher, with many vegetable seeds sprouting 20-30% faster than those sown directly outdoors.
- Construction: 1-4 hours (for simpler designs like cold frames or PVC structures). More elaborate DIY mini greenhouse ideas might take a weekend.
- Planting: 30 minutes – 1 hour, once the structure is ready.
- Daily Maintenance: 5-10 minutes for checking on plants, watering, and ventilation.
- Difficulty Level: Generally Beginner to Intermediate. The basic cold frame is definitely beginner-friendly, while more advanced designs involving shelving or automation lean towards intermediate.
Step-by-Step Gardening Process
Building your own mini greenhouse is a rewarding project. Let's walk through a common example: a simple PVC pipe or wooden stake frame covered with plastic sheeting.
Prepare Your Site

First, select a location that receives ample sunlight – ideally 6-8 hours a day. Level the ground if necessary. Ensure it’s protected from strong winds, perhaps near a fence or building. Clear any debris or weeds.
Construct the Frame
For a PVC frame, cut pipes to desired lengths for your base and hoops. Connect the base sections using elbow and T-connectors. Then, create hoops by bending PVC pipes and securing them to the base, either by inserting them into rebar stakes pounded into the ground or using specific connectors. If using wood, assemble a simple rectangular box frame for the base, then create an arched or pitched roof using additional wooden supports.
Attach the Plastic Sheeting
Carefully drape your clear plastic sheeting over the frame. Ensure it covers all sides and has enough overhang. Pull it taut to prevent sagging, which can collect rain or snow. Secure the plastic tightly to the frame using zip ties, clamps, or a staple gun. Consider adding a flap on one side that can be easily opened for ventilation.
Anchor the Greenhouse
To prevent your mini greenhouse from becoming a kite on a windy day, weigh down the edges of the plastic. Use heavy bricks, rocks, or sandbags around the perimeter. For more permanent structures, you might bury the plastic edges slightly in a trench.
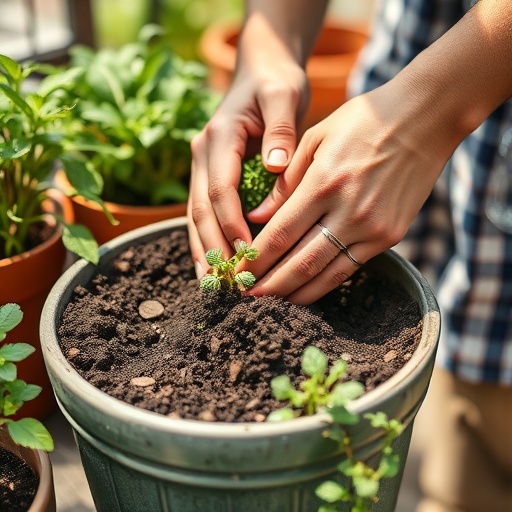
Add Your Planting Medium
Place your seed starting trays or pots inside the mini greenhouse. Fill them with your high-quality seed starting mix. Don’t worry if some soil spills; you can clean it up later. Just ensure your growing medium is level and ready for seeds.
Plant Your Seeds
Follow the planting instructions on your seed packets for depth and spacing. Gently press seeds into the soil and cover lightly. For small seeds, a light sprinkle of vermiculite can help retain moisture. Water thoroughly but gently with a fine-rose watering can or a misting bottle.
Monitor and Maintain
Keep a close eye on the temperature inside. On sunny days, temperatures can rise rapidly, exceeding 100°F (38°C) within minutes if not vented. Open a flap or lift a side to allow for airflow. In colder weather, keep it sealed. Check soil moisture daily; the enclosed environment means less frequent watering than outdoor plants, but consistent moisture is key for germination.
Growth & Care Tips
Consistent care is the cornerstone of a thriving mini greenhouse. Here’s how to ensure your plants flourish:
- Watering Frequency: While your mini greenhouse retains moisture, don’t neglect watering. Check the soil moisture daily by sticking your finger about an inch deep. Water when the top inch feels dry. Underwatering leads to wilting, while overwatering, a common issue, causes root rot in 60% of houseplants and seedlings. Aim for moist, not soggy, soil.
- Sunlight Exposure: Most vegetable seedlings and herbs require 6-8 hours of direct sunlight. Position your mini greenhouse to maximize this exposure. If light is insufficient, especially during winter months or for indoor setups, consider supplementing with LED grow lights. This is especially true for delicate starts that need strong light to prevent legginess.
- Pruning: Once seedlings develop their first true leaves, thinning is crucial. Snip weaker seedlings at the soil line to give stronger ones space to grow, ensuring better air circulation and nutrient uptake. For mature plants like herbs, regular harvesting acts as pruning, promoting bushier growth.
- Fertilization: Seed starting mixes typically contain few nutrients. Once seedlings develop a few sets of true leaves, begin feeding with a diluted liquid organic fertilizer (e.g., kelp meal or fish emulsion) at half strength every two weeks.
- Pest Prevention: The enclosed environment can be a double-edged sword. It protects from external pests but can foster internal ones. Inspect plants regularly for aphids, spider mites, or fungus gnats. Good air circulation (via a small fan or daily venting) helps. Introduce beneficial insects if necessary or use organic pest control methods like neem oil spray.
Eco-Friendly & Sustainable Alternatives
Gardening responsibly means minimizing our environmental footprint. Here are several ways to make your mini greenhouse practice greener:
- Composting: Start a small compost bin with kitchen scraps and garden waste. This produces nutrient-rich soil amendments, reducing the need for chemical fertilizers.
- Natural Fertilizers: Beyond compost, consider using worm castings, bone meal, or cottonseed meal. These slow-release options enrich your soil naturally.
- Water Conservation: Collect rainwater in a barrel to use for watering your plants. Inside the mini greenhouse, humidity is higher, reducing evaporation and thus your water needs. Mulching around larger plants can also help retain soil moisture. Always make sure to water your plants without overwatering them. For great tips on this, check out our guide on how to water balcony herbs without overwatering.
- Repurposed Materials: Your mini greenhouse itself can be a beacon of sustainability. Think old window panes for a cold frame, plastic bottles cut in half to cover individual seedlings, or even clear storage containers turned upside down. This reduces waste and saves money.
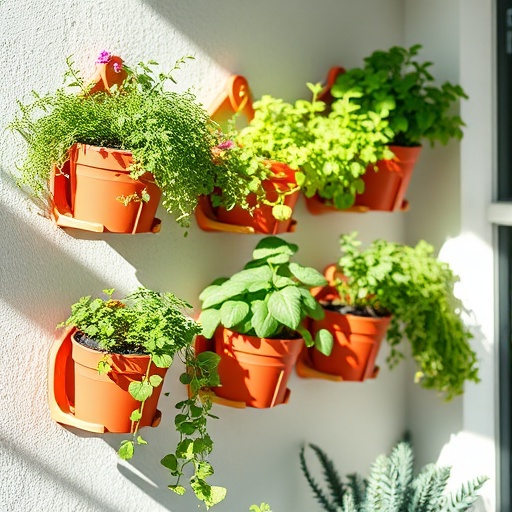
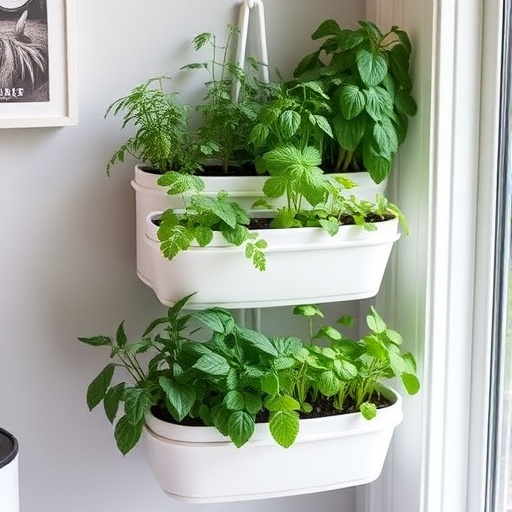
- Alternatives for Small Spaces: If a dedicated mini greenhouse isn’t an option, consider vertical gardening structures. Small shelving units covered with clear plastic become instant mini greenhouses. You can also explore options like DIY hanging herb planters for balconies or even use a simple grow tent for indoor propagation.
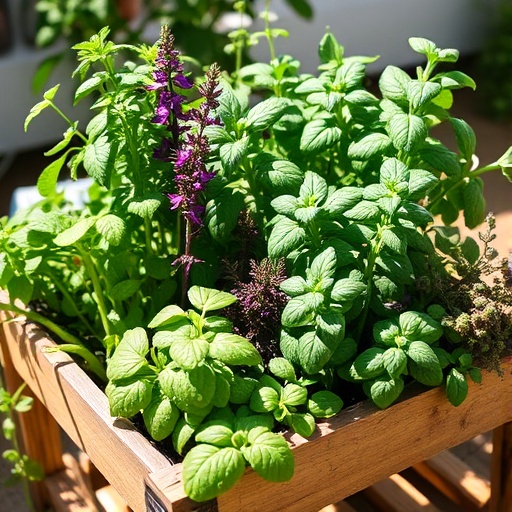
Creative Ideas & Uses
Mini greenhouse ideas aren’t just for starting seeds; they can be stunning focal points in your garden or home.
- Terrarium-Style Mini Greenhouses: For a decorative indoor touch, choose a beautiful glass terrarium or cloche. Plant small, humidity-loving plants like ferns, mosses, or tiny orchids. These create living art pieces.
- Repurposed Furniture Greenhouses: Transform an old bookshelf, cabinet, or even a drawer unit into a unique mini greenhouse. Add clear acrylic panels or glass doors, and illuminate with small LED strip lights. This makes for fantastic accent pieces in a sunroom or spacious kitchen.
- The "Cold Frame" as a Garden Feature: A well-built wooden cold frame can be a beautiful addition to a raised garden bed. Paint it a vibrant color or distress it for a shabby-chic look. You can even combine this with diy flower bed ideas for small yards.
- Vertical Mini Greenhouses: Ideal for urban dwellers or those with limited space. Stackable clear plastic containers or specially designed vertical grow towers can act as mini greenhouses, maximizing your growing footprint. This works wonderfully for balcony herb garden ideas for beginners.
- Seasonal Decorations: In non-growing seasons, many mini greenhouse structures can be repurposed. A cold frame could hold festive lights and decorations, or a beautiful glass mini greenhouse could display potted succulents or air plants, creating a stunning visual interest even in winter. For more imaginative decor ideas, check out our curated collection on Pinterest: [https://www.pinterest.com/janatjanay47/].
Common Mistakes to Avoid
Even seasoned gardeners make mistakes. Being aware of these pitfalls will save you time and plants:
- Poor Ventilation: This is perhaps the most common error. A closed mini greenhouse can quickly become a sauna, causing heat stress or, worse, fungal diseases like damping-off, which can wipe out a tray of seedlings overnight. Always provide daily ventilation, especially on sunny days.
- Overwatering: As mentioned, too much water suffocates roots. Seedlings are particularly susceptible. The soil should be consistently moist, not waterlogged. When in doubt, check a day later.
- Insufficient Light: While a mini greenhouse provides warmth, it doesn't automatically mean enough light. Plants will become "leggy" (tall, thin, and weak) if they're stretching for light. This weakens them dramatically, leading to lower survival rates. Ensure adequate natural light or use supplemental grow lights.
- Ignoring Pests: Pests can multiply rapidly in the warm, humid environment of a mini greenhouse. A small infestation can quickly become an epidemic if not addressed early. Regular inspection is key.
- Using Garden Soil: Never use garden soil in seed trays. It’s too heavy, compacts easily, and often contains weed seeds, pests, and diseases that can harm delicate seedlings. Always opt for a sterile seed-starting mix.
- Incorrect Size for Needs: Choosing a mini greenhouse that's too small for your ambitions or too large for your space can lead to frustration. Accurately assess how many plants you wish to grow and the available area before building or buying.
Maintenance & Storage Tips
Ensuring the longevity of your mini greenhouse and the health of your plants requires ongoing attention.
- Cleaning Your Structure: At the end of each growing season, or if you notice algae buildup, thoroughly clean your mini greenhouse. Use a mild soap and water solution, or a diluted bleach solution (1 part bleach to 9 parts water) to disinfect surfaces, especially important if you’ve had any disease outbreaks. This prevents pathogens from carrying over to the next planting cycle.
- Repairing Damage: Regularly inspect the plastic sheeting for tears or holes, which can compromise its ability to retain heat and humidity. Patch small tears with clear tape designed for outdoor use or replace severely damaged sections. For wooden frames, check for rot or loose connections.
- Seasonal Care: In winter, if your mini greenhouse isn't being actively used for growing, consider storing it away if it's portable. If it's a permanent structure, ensure it's well-anchored to withstand winter winds and heavy snow loads. Remove snow accumulation promptly to prevent structural damage.
- Seed Storage: If you’re saving seeds, store them in cool, dry, dark conditions in airtight containers. This maintains their viability for future planting.
- Addressing Yellow Leaves: Yellow leaves often indicate nutrient deficiency (e.g., nitrogen), overwatering leading to root issues, or sometimes insufficient light. Assess your watering habits and consider a light feeding or improved light conditions.
- Improving Poor Soil Drainage: If your pots or trays aren’t draining well, it's often due to compacted soil or blocked drainage holes. Repot with a better draining mix or clear the holes. For future plantings, add perlite or coarse sand to your soil mix for improved drainage.
Conclusion
Embracing mini greenhouse ideas can truly transform your gardening journey, offering an extended growing season, protection from unpredictable weather, and the sheer joy of nurturing plants from seed to harvest. From simple cold frames made of recycled materials to more elaborate structures, the possibilities are as varied as the plants you can grow. Remember, gardening is a continuous learning process. Don't be afraid to experiment, observe, and adapt your methods. The data consistently shows that a controlled environment dramatically improves plant success rates for home gardeners.
Ready to extend your gardening season and grow more of what you love? Pick one of these amazing mini greenhouse ideas and get started this weekend! Share your creations with us on social media using #MyMiniGreenhouse and let's inspire each other. For more gardening inspiration and practical tips, explore our other guides.
FAQ
Q1: What plants are best for a mini greenhouse?
A1: Many plants thrive in mini greenhouses. Excellent choices for propagation include vegetable seedlings (tomatoes, peppers, herbs) and flower starts. For year-round growth, cool-season crops like lettuce, spinach, and radishes do well, as do humidity-loving tropical plants.
Q2: How do I manage temperature in my mini greenhouse?
A2: Temperature regulation is crucial. On sunny days, open vents, doors, or lift the lid to allow hot air to escape and prevent overheating. Use a thermometer to monitor internal temperatures. On cold nights, ensure all openings are sealed, and consider adding a heat mat for extra warmth during seed germination.
Q3: Can I use a mini greenhouse indoors?
A3: Absolutely! Many mini greenhouse ideas are perfectly suited for indoor use. Smaller portable units, grow tents, or even cloches can create ideal environments. Just ensure adequate light, often requiring supplemental LED grow lights, and proper air circulation to prevent mold. Have a look at our easy indoor gardening setup for beginners for more inspiration.
Q4: How often should I water plants in a mini greenhouse?
A4: Due to higher humidity levels, plants in a mini greenhouse typically need less frequent watering than outdoor plants. Check the soil daily by feeling the top inch. Water when it feels dry, aiming for consistently moist but not soggy soil.
Q5: What’s the best way to ventilate a mini greenhouse?
A5: Proper ventilation prevents diseases and regulates temperature. For simple designs, manually open the lid or flap daily. For larger structures, consider automatic vent openers that react to temperature changes. A small, oscillating fan can also greatly improve air circulation, especially in enclosed spaces or for indoor mini greenhouse ideas.
Q6: Can a mini greenhouse protect plants from frost?
A6: Yes, a mini greenhouse acts as a protective barrier, elevating temperatures inside by several degrees above ambient outdoor temperatures. This can protect plants from light frosts. For more severe cold, you can add extra insulation by covering the structure with blankets or bubble wrap on cold nights.
Q7: How do I prevent pests and diseases in my mini greenhouse?
A7: Good hygiene is paramount. Use sterile potting mix, clean tools, and inspect new plants before introducing them. Promote good airflow through ventilation, and monitor plants regularly for any signs of pests or diseases. Address issues promptly with organic pest control methods like neem oil or insecticidal soap.
Explore More Gardening Adventures:
Ready to dive deeper into specific gardening topics? Here are a few curated articles from our site that might pique your interest:
- If you're eager to attract more biodiversity to your garden, discover our insights on how to attract butterflies and bees with flowers.
- For those with limited outdoor space, our guide on how to start a balcony herb garden in small spaces offers fantastic solutions.
- Interested in maximizing your vertical space? Check out these vertical balcony herb garden design ideas for clever inspiration.